Photoshop Essentials · Transcript · · Updated
How to Open Images as Layers in Photoshop – Transcript
Video by Photoshop Essentials · Watch the original on YouTube
Summary
AI-generated from the transcript. Verify details against the source video.
- Steve Patterson demonstrates how to open multiple images as layers into a new Photoshop document using the load files into stack command.
- To add an additional image into an existing document, users can choose the place embedded command from the file menu.
- Preferences in Photoshop can be adjusted to skip free transform or stop automatically creating smart objects when placing images.
Use this video with Pro
Reading, copying and transcript downloads are free. Create saved AI results for this video with a signed-in Pro account ($9/month).
Transcript
Search ignores accents. All transcript text stays visible.
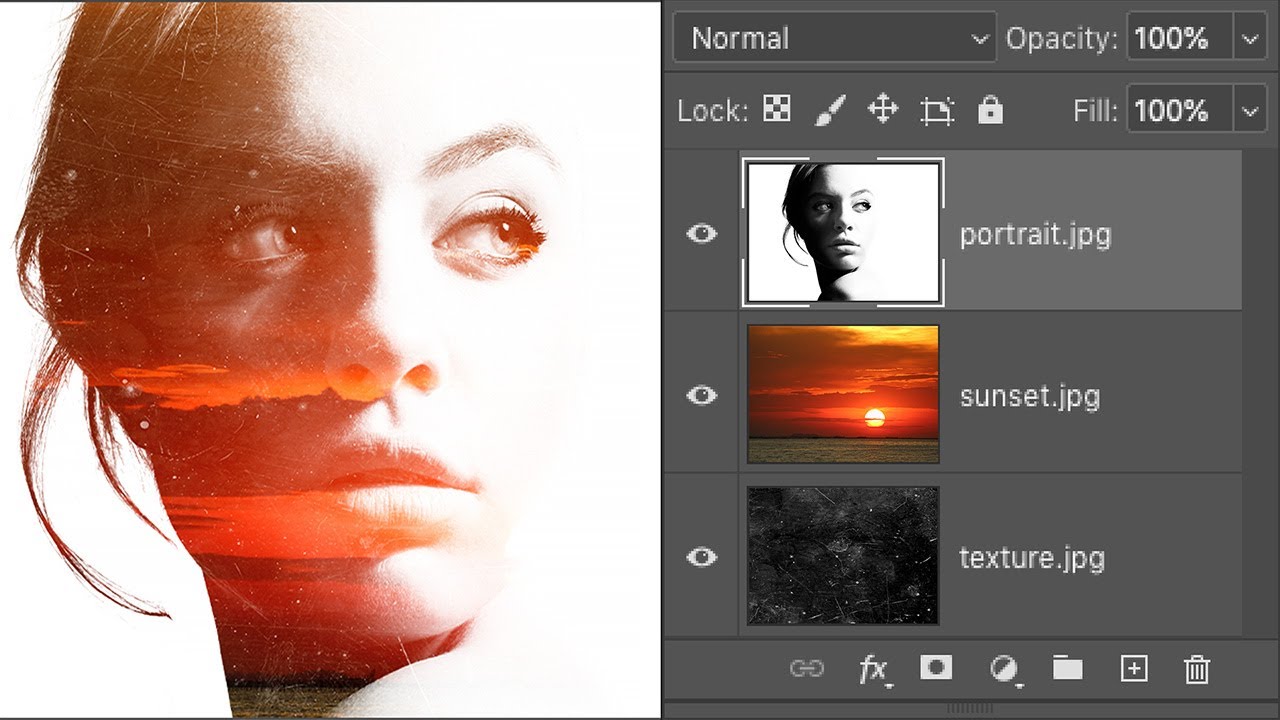
hey everyone Steve Patterson here from photoshop essentials in this video I'll show you how easy it is to open multiple images as layers into a Photoshop document and how to add more images to the document as you need them we'll also look at a few options in Photoshop sprayer answers that make placing images into your document even faster and at the end I'll show you the steps I used to blend my images into this double
exposure effect I'm using Photoshop CC 20/20 but any recent version will work if you like these videos be sure to subscribe and let's get started we'll start by learning how to open multiple images as layers into a document for that we use a command called load files into stack and not only does this command load your files but it also creates the document for you here's how
to use it go up to the file menu in the menu bar choose scripts and then choose load files into stack then in the load layers dialog box set the use option to either files or folder files lets you select images from within a folder while folder will open every image in the folder you select I'll choose files then
click the Browse button navigate to the folder that holds your images and choose the ones you need I'll select all three images in the folder and notice the names of my images we have portrait sunset and texture Photoshop will use these names when naming the layers so it's a good idea to rename your files first then with your images selected click open and the names of your files
appear in the list if you selected a file by mistake click on its name to highlight it and then click remove leave the two options at the bottom of the dialog box attempt to automatically align source images and create smart object after loading layers unchecked and then click OK to load your images Photoshop creates a new document and after a few seconds the images are
placed into it in the layers panel each image appears on its own layer and each layer is named after the name of the file you can turn layers on or off to view your images by clicking the visibility icons and that's how to open multiple images into your document next let's learn how to add more images to the document and for that we use a different command called place embedded
in the layers panel I'll delete my portrait layer by dragging it down onto the trash bin to add a new image to the document go up to the file menu and choose place embedded there's also a similar command called place linked which will simply link to the file on your computer but to load the image directly into your document choose place embedded select the image you want to
add I'll choose my portrait image and then click place now before Photoshop places the image it first opens the free transform command so you can resize the image if needed but in most cases you can just accept the current size and close free transform by clicking the checkmark in the options bar you can also press the Enter key or the return key on a Mac and Photoshop places the
image in the document but notice in the layers panel that the image appears not as a normal layer but as a smart object indicated by the icon in the lower right of the thumbnail now smart objects are very powerful and I cover how to use them in other videos but they also have limitations and the biggest one is that a smart object is not directly editable for example I'll select the rectangular
marquee tool from the toolbar and then I'll drag a selection around the woman's eyes I'll invert the selection by going up to the Select menu and choosing inverse and then I'll everything around my initial selection by pressing the backspace key or the Delete key on a Mac but instead of deleting the area Photoshop displays a warning that it could not complete my
request because the smart object is not directly editable I'll click OK to close it so depending on what you'll be doing with the image a smart object may not be what you want in that case you'll need to convert the smart object into a normal layer after you've placed it into your document to do that in the layers panel right-click or control-click on a mac in the empty gray area beside the
smart objects name and then choose rasterize layer' from the menu and now if I press the backspace key or the Delete key on a Mac this time Photoshop deletes the selected area as expected I'll undo that by going up to the Edit menu and choosing undo clear and then I'll remove my selection outline by going to the Select menu and choosing
deselect so now that we know how to place an image into a document let's look at a few options in Photoshop sprayer answers that can help you place images even faster to open the Preferences on a Windows PC go up to the Edit menu on a Mac go up to the Photoshop menu from there choose preferences and then general to prevent Photoshop from opening the
free transform command every time you place an image turn on skip transform when placing to stop Photoshop from converting your images into smart objects turn off always create smart objects when placing and this third option won't speed things up but it's definitely worth knowing about if you place an image into a document and the image is larger than the canvas size Photoshop will automatically resize the
image to fit the canvas in other words it will make your image smaller if that's not what you want and you would rather keep the image at its original size and turn off resize image during place to save your changes click OK to close the dialog box so at this point we've covered everything we set out to learn we know how to load multiple images as layers using the load files into stack command
and how to add more images using the place embedded command I'll finish off this video by blending my images into a double exposure effect to create the effect I need to keep the white areas of my portrait and have my other two images appearing in the darker areas of the woman's face so in the layers panel I'll click on my sunset layer and I'll drag it above the portrait layer then to
blend the portrait image and the sunset image together I'll change the blend mode of the sunset layer from normal to screen next I'll click on my texture layer and I'll drag it up above the other two layers then to hide the dark areas of the texture and keep only the lighter areas I'll again change the blend mode to screen I'll also feed the texture by
lowering the layers opacity finally I'll merge all three of my layers onto a new layer on a Windows PC I'll press shift ctrl Alt + E and on a Mac I would press shift command option + E and then to add a bit more contrast I'll go up to the image menu and I'll choose Auto contrast
and there we have it that's a simple way to create a double exposure effect in Photoshop as always I hope you enjoyed this video and if you did don't forget to like it share it and subscribe to my channel visit my website photoshop essentials comm where you'll find hundreds of Photoshop tutorials thanks for watching and I'll see you next time I'm Steve Patterson from photoshop essentials calm